April 18, 2013

Recycled kitchen - continued

In January we completed the first stage of the kitchen cupboards, using recycled hoop pine. The part I was most looking forward to was the island bench, which Russell has just completed.


I've mentioned elsewhere how I prefer hand made items to overpriced commercial products (yes, I know, the economy would not survive if everyone was like me!), and how we enjoy recycling materials. Well this is the ultimate recycling project!

The legs for the island bench are made from some short scraps of the crap timber that were used to support the loads of timber we had delivered (two 90x45 glued together). The frame is made from bits of 70x35 pine framing left over from the build. In fact one bit was used by the builder in the original markout for the foundations!
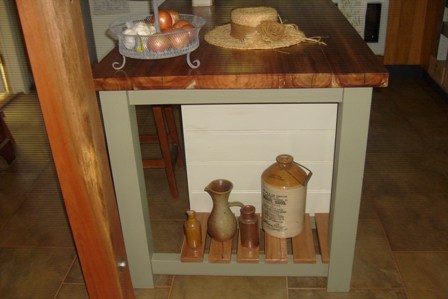


The bench top is made from some black wattle slabs that we had milled when we cleared some trees for the building. Four slabs are joined with threaded rod to make the top. This was Russell's first go at doing a slab and what he learned will be put to good use for the other slab benches that I have lined up for him!


A few remaining Blackbutt floorboards from the attic bedrooms are used for the drawer fronts, (complete with hidden compost bin drawer) and the ornament shelf.


And the ends (which include a hidden rubbish bin) are scraps of the T&G pine used on our walls.
 

March 16, 2013

Junk craft

Russell is the tip and skip king. He is always picking up interesting things, particularly from the tips of dam sites which he visits as part of his seismology work.

Beeswax candles

These ceramic power pole insulators make terrific candle holders, either with regular candles, or filled with beeswax.

Insulators as candle holders


 They're fitted into a routed hole in some well-worn timber. Nice on the dining table, or beside the bath - either way with a glass of wine!


January 6, 2013

Another recycled kitchen!

It's been a while between posts, but our trip to Europe has inspired us with new and creative ideas for building from recycled materials. But first, I wanted a finished kitchen!

When we moved into the house two years ago, we put in the minimum of kitchen to keep us going - just the shells with some dodgy fronts - while we finished important things like the earth walls, and the new cottage.

For Christmas Russell promised me kitchen door fronts - or at least some of them! We've always used Ikea carcases for our kitchens. I realise melamine is not the most eco-friendly of materials, but their system is so practical, and Ikea have a few eco credentials.

Recycled hoop pine drawer fronts

 The main cupboards and drawers have been faced with recycled hoop pine VJ (wall panelling from old Queenslander houses), part of the stash we've squirreled away in the past for just such projects.

Recycled pine on dishwasher and cupboard

Russell has done his standard handles made from old silver forks, used in both the other cottages - a theme running through the place!

Fork handle inspired by Edvard Munch "The Scream"

Silver forks make great handles


Next up will be the island bench, with a bench top of solid wattle from our property.

August 5, 2012

Not everyone has a beautiful laundry...!

If you run an accommodation business, you spend a lot of time in the laundry. For this reason, I reckoned I deserved a beautiful laundry.

Ours has earth walls, and some wonderful recycled margin light windows with pink and green glass. When the afternoon sun shines in, it is like a jewel box.

Why not hang pictures in the laundry?


Russell made these great hooks for the laundry baskets, using old weathered wood and some railway spikes (nails).


July 13, 2012

Sustainability courses, and the course of sustinability

I was recently alerted to this site, which offers courses in sustainable building and practices. All courses are offered online, and prices are very reasonable. Subjects covered include sustainable design, green building principles, renewable energy, and sustainable waste management.

While it mainly focuses on businesses trying to reduce their carbon footprint and operate more sustainably, there are also courses aimed at individuals and owner builders. Content Developer James Huddleston says he aims to try and increase the number of courses for owner builders.

If they do it in Mongolia, why don't we?

Meanwhile it's very disappointing that the course of sustainability in Queensland has been severely compromised by the State Government slashing the feed-in tariff for solar electricity from 44c/kwh to 8c/kwh, making it one of the lowest in Australia. In a country like Australia with almost unlimited sunshine and rising power costs, I believe the government should be embracing solar, not making it less attractive.

One slight positive is that solar PV suppliers were flooded with requests as many people, ourselves included, signed up for solar power before the rate cut-off  on 10th July .

June 21, 2012

Frogs

The incessant wet weather several weeks ago gave us an evening chorus of frogs. These little guys found the tub of water Russell had been using for the light earth mixing, and made themselves at home.

Red eyed tree frogs

A couple of days later we noticed eggs floating on top of the water, and within a week we had dozens of tadpoles.

We've been feeding them lettuce leaves and watching them grow. Now the tiniest of frogs - no bigger than my thumbnail - are heading off into the forest. We like to think we're doing our bit for the wildlife!!

April 11, 2012

Rendering the earth walls

Most of our earth walls, as well as the Durra panels, are now ready for rendering.
 
Russell spent a couple of days last year at a strawbale building workshop run by Huff andPuff. The main reason he went was to learn about different types of render, and how to apply them to earth walls. Unlike straw bale, which needs a thick ‘scratch’ coat to fill out the uneven surface, our light earth walls are made in formwork and therefore have a fairly even surface, so need far less render.

The render sticks well to the rough surface of the light earth walls, but we stapled wire onto the parts where there was just timber studs, to help the render to stick there. Where we used Durra straw panels we thought we could just ‘rough up’ the surface to make the render stick. We tried a mallet with nails in it, but in the end we decided that this would be very slow and noisy (i.e. it couldn’t be done on the weekends, when we have cottage guests), so we covered the panels with wire mesh using a staple gun. 

Wire mesh on walls. Window reveals are rendered first and allowed to dry

We had already tried a render mixture of sand, our red clay soil, and lime in equal proportions, and this had worked well. The soil needs to be finely sieved, and for this we used Mark VII, the same mechanical sieve we used for the earth in the walls (Mark VII followed Marks I - VI, and is the Rolls Royce model of sieves!). 

It's important to first wet down the light earth with a spray bottle to make it take the render, and to prevent the wall from sucking the moisture out of the render too quickly. 

On the first walls we placed some guide strips down the studs to screed against, to help get a uniform, level surface. Russell later improved on this by devising a render thicknesser to run 15mm over the surface and take off the excess.

Render thicknesser
Render thicknesser


As the render dries, it will crack a bit. To minimise this we found it was better to put on a rough coat first, then a thinner second coat when the first has dried a bit. 
Clay render - rough coat
Clay render - second coat
 

A very thin layer of render, basically a clay paint, will be added if the cracks are too extreme. But we actually like the look. The dried render has a real aged, Mediterranean quality, with the lime producing a gentle whitish ‘bloom’ in the soft pink earth colour.