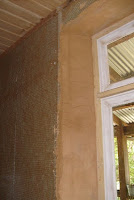
Most of our earth walls, as well as the Durra panels, are now ready for rendering.
Russell spent a couple of days last year at a strawbale building workshop run by Huff andPuff. The main reason he went was to learn about different types of render, and how to apply them to earth walls. Unlike straw bale, which needs a thick ‘scratch’ coat to fill out the uneven surface, our light earth walls are made in formwork and therefore have a fairly even surface, so need far less render.
The render sticks well to the rough surface of the light earth walls, but we stapled wire onto the parts where there was just timber studs, to help the render to stick there. Where we used Durra straw panels we thought we could just ‘rough up’ the surface to make the render stick. We tried a mallet with nails in it, but in the end we decided that this would be very slow and noisy (i.e. it couldn’t be done on the weekends, when we have cottage guests), so we covered the panels with wire mesh using a staple gun.
 |
| Wire mesh on walls. Window reveals are rendered first and allowed to dry |
We had already tried a render mixture of sand, our red clay soil, and lime in equal proportions, and this had worked well. The soil needs to be finely sieved, and for this we used Mark VII, the same mechanical sieve we used for the earth in the walls (Mark VII followed Marks I - VI, and is the Rolls Royce model of sieves!).
It's important to first wet down the light earth with a spray bottle to make it take the render, and to prevent the wall from sucking the moisture out of the render too quickly.
It's important to first wet down the light earth with a spray bottle to make it take the render, and to prevent the wall from sucking the moisture out of the render too quickly.
On the first walls we placed some guide strips down the studs to screed against, to help get a uniform, level surface. Russell later improved on this by devising a render thicknesser to run 15mm over the surface and take off the excess.
 |
| Render thicknesser |
 |
| Render thicknesser |
As the render dries, it will crack a bit. To minimise this we found it was better to put on a rough coat first, then a thinner second coat when the first has dried a bit.
 |
| Clay render - rough coat |
 |
| Clay render - second coat |
A very thin layer of render, basically a clay paint, will be added if the cracks are too extreme. But we actually like the look. The dried render has a real aged, Mediterranean quality, with the lime producing a gentle whitish ‘bloom’ in the soft pink earth colour.


No comments:
Post a Comment