Showing posts with label Eco building. Show all posts

September 5, 2018

Retro vanity

Well, it's been a long time coming! When we first built the house nine years ago the downstairs toilet had a 'temporary' vanity. It was made from a sheet of laminex-coated ply, four pine posts (from the original set-out posts for the house) and a second hand sink. Not a pretty thing, and after several years it had started to sag in the middle.

A few years back we bought four cedar table legs on ebay. The tops were in bad condition, so Russell removed them and made new tops from old cedar window frames.


The legs then just needed a quick run through a lathe (via a friend's Men's Shed connection).


Rails and shelf were made from the remains of the wardrobe rebuild done earlier in the year.

As we have another old marble-topped washstand in the room, we bought a Corian top in 'raincloud', which has similar colours to the old marble. The Corian is not cheap, and we had to limit the width to 930mm as this is the standard width the Corian comes in - any wider and it would have almost doubled the price.


The sink and tap are Bunnings purchases, very much on the budget end. Tiles are a mixed selection from oldworldtiles.com


October 3, 2017

Cubby house renovation

There was a small cubby house, called Kurrajong Station, on the property when we bought it, built probably forty years ago and now in a rather run down condition. With a visit from grandchildren imminent, we decided now was the time to give it some TLC and an upgrade.

Before - rotten floor boards on the verandah, mould on the walls, worn battens, peeling paintwork, wobbly railings. Fortunately this job was on a small enough scale to complete in a week or two.


 We started by pulling out the verandah floor, scrubbing the walls and sanding flaking paint. We had some left over floorboards from another house to fix the verandah, and fencing wire for the ballustrade. After a couple of coats of paint it was looking good.

At our local tip's Treasure Island we found a kid-sized table and chairs that only needed a leg mended. We added some pictures inside (some of which had been done at school by my children!), painted up a piece of ply to make a blackboard, and added some toys. Last thing to be added was a slippery slide (from Bunnings).

After - ready for the arrival of grandchildren!


This was a very satisfying project that could be completed just over a week. The grandkids loved it, and it should do for another couple of decades!


September 4, 2016

 I'd had this beautiful old oak wardrobe for ages, but like many of its era, it was too shallow for the depth of a coat hanger. For years it was just a storage cupboard, too impractical for clothes.

When we moved we deconstructed it, hoping to put the doors to use again as a built in wardrobe in the house, while the base would become a window seat.


We contacted local fine furniture maker (and amazing wildlife artist!) Garry Rogers to turn the whole thing into a new, practical built-in wardrobe in the sloping walls of our attic bedroom.

Garry made up the front frame in his workshop, using the wood from the side of the wardrobe as new drawer fronts, and wood from our property for a new pediment on top.


Garry's attention to detail is meticulous. All the doors were refinished and cracks and imperfections fixed.


The finished frame was then built into the sloping upstairs hallway, where it serves as a very practical wardrobe with shoe drawers below.


We're extremely grateful to Garry for bringing this beautiful piece of furniture back to life, and cannot recommend highly enough his fine woodworking skills.

July 12, 2015

Updating White Gum Cottage - part 1

It's now ten years since we opened Turkey's Nest at Mount Glorious (we had a small B&B in Brisbane before that). When we bought the property the original cottage, White Gum - an old forestry workers' cottage moved from Beerburrum - was a little 'rough around the edges'. The best view was from the laundry, the kitchen faced a blank wall, and the bedroom had no view!

We renovated it in 2003, moving rooms and adding a new bathroom and kitchen.

The original kitchen - pretty grim!

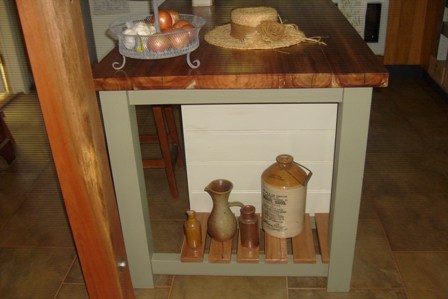
The 2003 renovated White Gum kitchen

 Our guests love the cottage and its old world feel, but last year we decided it was now due for another makeover (aren't we all?!!) that would update the cottage without losing its charm.

The first job was to replace the flooring. There was carpet in the living and dining areas, and lino in the kitchen, with a bit of slate tile at the front door.

original flooring - carpet, tiles, lino

As it's a small area, a uniform flooring throughout this space was preferable. Unfortunately the existing timber floor under the carpet was an uneven, patched-together, un-salvageable mess, so we decided to cover the lot with a floating bamboo floor. Various finishes are available, including an 'aged' finish which suited the style of the cottage.

Bamboo is a renewable resource- it is a grass and grows very quickly. Whereas oak takes 120 years to grow to maturity, bamboo can be harvested in three, regenerates without need for replanting, and requires minimal fertilization or pesticides. The flooring can also easily be laid DIY.

Russell and a friend laid the floor in a day and a half. The foam underlay overcame the unevenness of the existing timber floor. The slowest part was getting the initial line, after which the boards clicked together quickly.


It took another day to make and add hardwood skirtings. A couple of rugs, sourced cheaply from Grays Online, completed the picture. It gives the whole cottage a finished, unified look and has maintained the old world feel.


The only hassle was a bit of swelling and lifting when the wet weather hit, which required some trimming. In retrospect, we should have left a little more space around the edges, under the skirting boards, to start with, and no further adjustments would have been required.

January 23, 2015

Drying room

I'm a great believer in all washing being hung on the line, and I rarely use a dryer. But we get a fair amount of wet weather on the mountain, and endless days of rain and high humidity are not conducive to drying multiple loads of sheets and towels.

Russell built this drying rack which can be lifted by a pulley system up to the ceiling. By adding a dehumidifier in the laundry, we have a solution that can deal with a fair amount of washing in a reasonably short time, and without the expense (and constant loading/unloading) of a dryer.

Rack in raised position


The rack is made from 25.4mm square section aluminium channeling with click-together corners, all from Bunnings.

Pulleys run across to rope down one wall


A series of pulleys make it easy to lift even a full load. Russell sourced the pulleys on the web, much cheaper than he could buy them locally.

Rack lowered for loading


In the lowered position it's easy even for short people to reach!

 Once it's pulled up, it's well out of the way (it helps to have 2.8m ceilings).


Rope rings and wall cleats

A couple of rings on the pull rope, plus cleats on the wall, mean it can be easily held at either the two loading positions (one for short people, one for tall!) or the drying position.

You need to have a closable laundry for the dehumidifier to be effective. Dehumidifiers run on considerably less power than a dryer. Buying a dehumidifier on Gumtree for less than a third of retail price was a bonus!


September 12, 2014

Winner - Best Eco-friendly Property, Queensland!

We're a winner!
 
We're very excited to have won Best Eco-Friendly Property, Queensland in the Stayz tourism group 2014 Holiday Rental Awards.
 

We take our eco credentials very seriously, so it is great to be recognised for our efforts by what is now one of the largest tourism groups in Australia. 

As a member of the Land for Wildlife Scheme, Turkey's Nest forms part of a wildlife corridor that links private properties with the National Park.

Both in our buildings and in our day-to-day work on the property, we aim to minimise our impact on the environment.

March 30, 2014

Pressed metal ceilings

Our first project for the year has been installing pressed metal ceilings in three rooms of the house.

We sourced the pressed metal panels from Heritage Ceilings who have a tremendous range of traditional as well as more modern styles.

We'd had a quote of $11000 to install the ceilings, so decided instead to do it ourselves. The first job was to paint all 60 panels, plus cable moulding and corner rosettes, with three coats of paint, finishing with a gloss enamel. If you have to paint ceilings, it is certainly way easier when you can do it on the ground before they go up!

Installation started with the downstairs 'powder room' as it was the simplest - all one style of panel with no border.


Next was the dining room. This presented some challenges with angles around the bay window, and the additional features of cable moulding and border panels.


The final room was the yet-to-be-completed Macadamia Suite, the B&B suite at the end of the house.


All rooms were finished with timber cornice. It pays to spend time filling nail holes and joins then painting them  - tedious, but it results in a much more professional finish.

In all, putting up pressed metal ceilings is not particularly difficult. It requires two people to hold the panels up, and pre-drilling the nail holes helps. Our main concern was that the panels should be well aligned - like tiling, it would look awful if the lines were wobbly. But the panels have ridges on the edge, which allow for a sort of automatic alignment, so it wasn't as difficult as expected.

It took us about eleven days to put up the three rooms. Given the installation quote we had, that equates to $1000 per day for our work. Better that we usually get!

June 3, 2013

Happiness is a well-organised pantry!

For someone who likes cooking, a well-organised pantry is a must. For a couple of years I had made do with an old melamine cupboard in the recess which would eventually be the pantry. All the shelves were the same height, and it was very deep, so things got lost!


Before


We began by taking out the cupboard and lining and painting the interior.


Shelves are hardwood T&G flooring


Russell made shelves from some old recycled floorboards, which were hard and strong. He ran them through the thicknesser first, to take off the old finish. The spacing of the shelves was based on the sizes of what we usually keep in the pantry, and the shelves are in a U-shape so we can walk in and find things without them being hidden at the back.


On the front we added a pair of recycled French doors, and some architrave. The glass is lined with fabric (an old table cloth!) in case the interior ceases to be as beautifully organised as it is now!

Recycled French doors on the front


Super-organised pantry space!


Result - one happy cook!


April 18, 2013

Recycled kitchen - continued

In January we completed the first stage of the kitchen cupboards, using recycled hoop pine. The part I was most looking forward to was the island bench, which Russell has just completed.


I've mentioned elsewhere how I prefer hand made items to overpriced commercial products (yes, I know, the economy would not survive if everyone was like me!), and how we enjoy recycling materials. Well this is the ultimate recycling project!

The legs for the island bench are made from some short scraps of the crap timber that were used to support the loads of timber we had delivered (two 90x45 glued together). The frame is made from bits of 70x35 pine framing left over from the build. In fact one bit was used by the builder in the original markout for the foundations!


The bench top is made from some black wattle slabs that we had milled when we cleared some trees for the building. Four slabs are joined with threaded rod to make the top. This was Russell's first go at doing a slab and what he learned will be put to good use for the other slab benches that I have lined up for him!


A few remaining Blackbutt floorboards from the attic bedrooms are used for the drawer fronts, (complete with hidden compost bin drawer) and the ornament shelf.


And the ends (which include a hidden rubbish bin) are scraps of the T&G pine used on our walls.
 

January 6, 2013

Another recycled kitchen!

It's been a while between posts, but our trip to Europe has inspired us with new and creative ideas for building from recycled materials. But first, I wanted a finished kitchen!

When we moved into the house two years ago, we put in the minimum of kitchen to keep us going - just the shells with some dodgy fronts - while we finished important things like the earth walls, and the new cottage.

For Christmas Russell promised me kitchen door fronts - or at least some of them! We've always used Ikea carcases for our kitchens. I realise melamine is not the most eco-friendly of materials, but their system is so practical, and Ikea have a few eco credentials.

Recycled hoop pine drawer fronts

 The main cupboards and drawers have been faced with recycled hoop pine VJ (wall panelling from old Queenslander houses), part of the stash we've squirreled away in the past for just such projects.

Recycled pine on dishwasher and cupboard

Russell has done his standard handles made from old silver forks, used in both the other cottages - a theme running through the place!

Fork handle inspired by Edvard Munch "The Scream"

Silver forks make great handles


Next up will be the island bench, with a bench top of solid wattle from our property.